
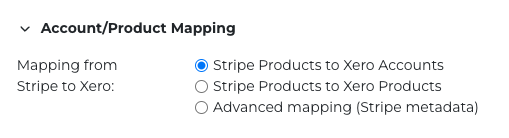
There are three options for mapping between Stripe and Xero:
-
Stripe Products to Xero Accounts - This is the simplest option and an easy way to get started if you don’t have lots of products. For each of your Stripe Products select a Xero Account from the drop down list.
-
Stripe Products to Xero Products - If you already have products and/or services configured in Xero you may prefer to choose a Xero Product/Service for each Stripe Products
-
Advanced Mapping (Stripe metadata) - If you have a high volume of products in Stripe and/or you are using or are familiar with Stripe Metadata the advanced mapping feature will allow you to automatically allocate invoices to Xero Accounts or Xero Products & Services based on the metadata stored in Stripe against Invoices, Subscriptions and Products.
Stripe Products to Xero Accounts
-
Select the Stripe Products to Xero Accounts option for Mapping
-
SubSync will show all of your Stripe Products on the left
-
On the right hand side use the Select Xero Account drop down menu to select an option from your Xero Chart of Accounts - all Stripe invoice line items for that product will now be allocated to that Xero Account on invoices.
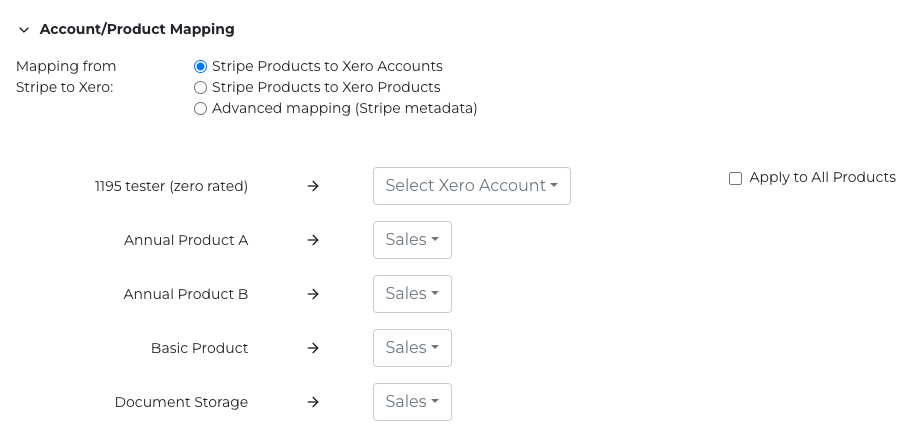
Tip: If you want to apply the same item to all products, select the Apply to All Products checkbox before choosing a Xero Account. You can then de-select this checkbox to alter individual records again.
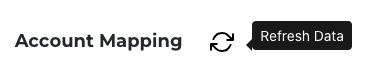
Tip: SubSync gets your current list of Xero Accounts and Products/Services on initial connection and every 24 hours - if you make a change in Xero and want to see that straight away in SubSync, press the Refresh Data button at the top of the settings screen.
Stripe Products to Xero Products
-
Select the Stripe Products to Xero Products option for Mapping
-
SubSync will show all of your Stripe Products on the left
-
On the right hand side use the Select Xero Item drop down menu to select an option from your Xero Products or Services - all Stripe invoice line items for that product will now be allocated to that Xero Product/Service on invoices.
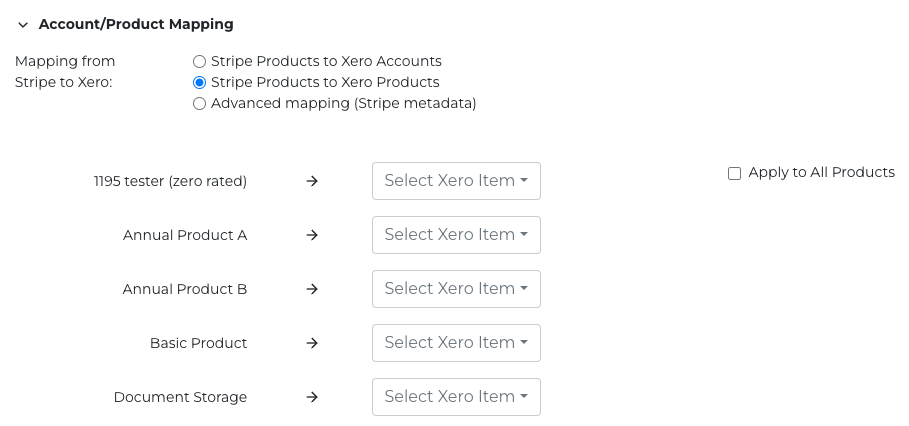
Tip: If you want to apply the same item to all products, select the Apply to All Products checkbox before choosing a Xero Product/Service. You can then de-select this checkbox to alter individual records again.
Tip: SubSync gets your current list of Xero Accounts and Products/Services on initial connection and every 24 hours - if you make a change in Xero and want to see that straight away in SubSync, press the Refresh Data button at the top of the settings screen.
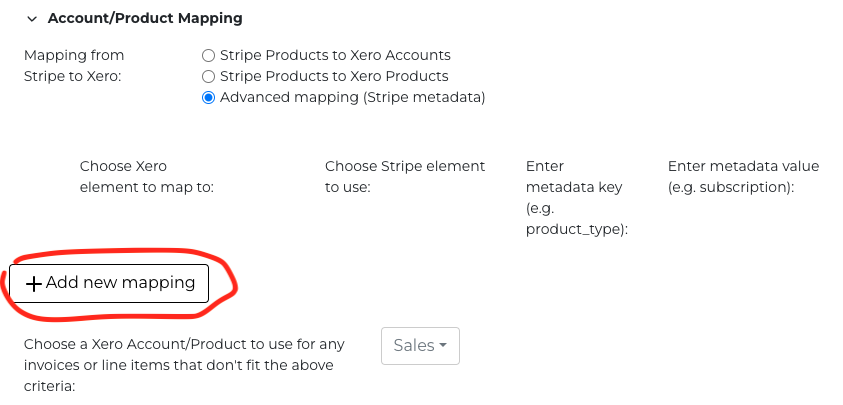
Advanced mapping (Stripe metadata)
-
Select the Advanced mapping (Stripe metadata) option for Mapping
-
Press the + Add new mapping button to create your first mapping
-
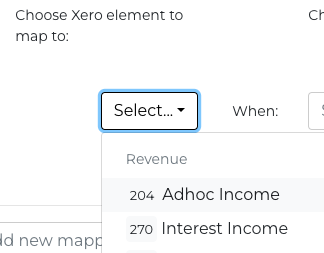
For each mapping use the drop down menu to select an item from the Xero Chart of Accounts or a Xero Product/Service (the Products & Services will appear at the end of the list)
-
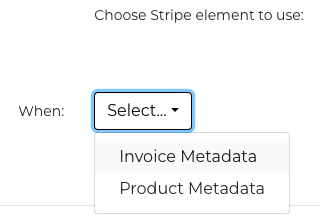
Next choose to act on either Stripe Invoice metadata or Stripe Product metadata. Note that metadata on a Stripe Subscription will also be available on invoices generated under that subscription.
-
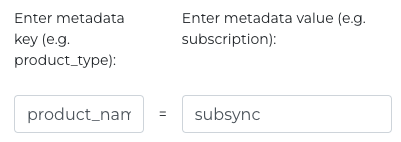
All Stripe metadata is in the form of a key and a value - e.g. key = product_name and value = subsync. Enter a key and a value - all invoice line items that match this key & value will now be mapped to the Xero Account or Product/Service selected in step 3 above.
-
If you have multiple rules that you want to combine for a mapping - e.g. Product metadata of product_name=subsync and Invoice metadata of customer_country=dharawal, use the Add Rule button to create another rule. For the technically minded, by adding a rule you are applying AND logic.
-
You can add as many rules as you like - use the + Add new mapping button to add each one. For the technically minded each mapping is applying OR logic.
The order of the mappings is important - SubSync will process them strictly from top to bottom. You can use the up & down arrows on the left hand side to move individual mappings up or down in the processing order ![]()
Tip: SubSync gets your current list of Xero Accounts and Products/Services on initial connection and every 24 hours - if you make a change in Xero and want to see that straight away in SubSync, press the Refresh Data button at the top of the settings screen.
In the below video you can see how Stripe sales from different regions are mapped to different Xero accounts based on invoice metadata.